Installing an SSL certificate and enabling HTTPS for your foreign trade (e-commerce) website is an essential step in international online marketing. If you are using DreamHost as your hosting provider, here’s how you can add an SSL certificate to your website.
DreamHost Overview: DreamHost, founded in 1999, is a web hosting company based in the United States. They currently host over 1.5 million websites for more than 400,000 customers. DreamHost offers services such as domain registration, shared hosting (including specialized WordPress hosting), VPS (Virtual Private Servers), VPS Cloud (on the openstack cloud platform), cloud storage, and dedicated servers. DreamHost has been a recommended hosting provider for the popular open-source platform WordPress for many years.
Official Website: Visit the official DreamHost website by clicking here.
DreamHost SSL Certificate Installation Tutorial:
Step 1: Log into your DreamHost Hosting Panel. From the dashboard, select the “Domains” menu on the left and then choose the “SSL/TLS Certificates” submenu.
On the SSL certificate management page on the right, find the domain for which you want to add an SSL certificate and click the “Add” button to begin.

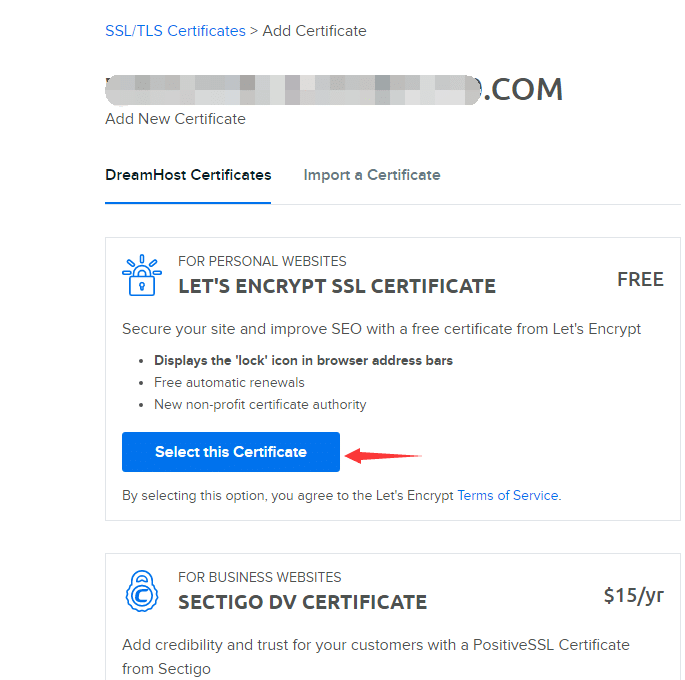
Step 2: Choose the SSL certificate type. There are two options available: a free Let’s Encrypt SSL certificate and a paid Sectigo DV Certificate ($15/year). Typically, foreign trade B2B websites can use the free version, while B2C websites may choose the paid version based on their needs.
Once you’ve selected the certificate type, click “Select this Certificate” to proceed.

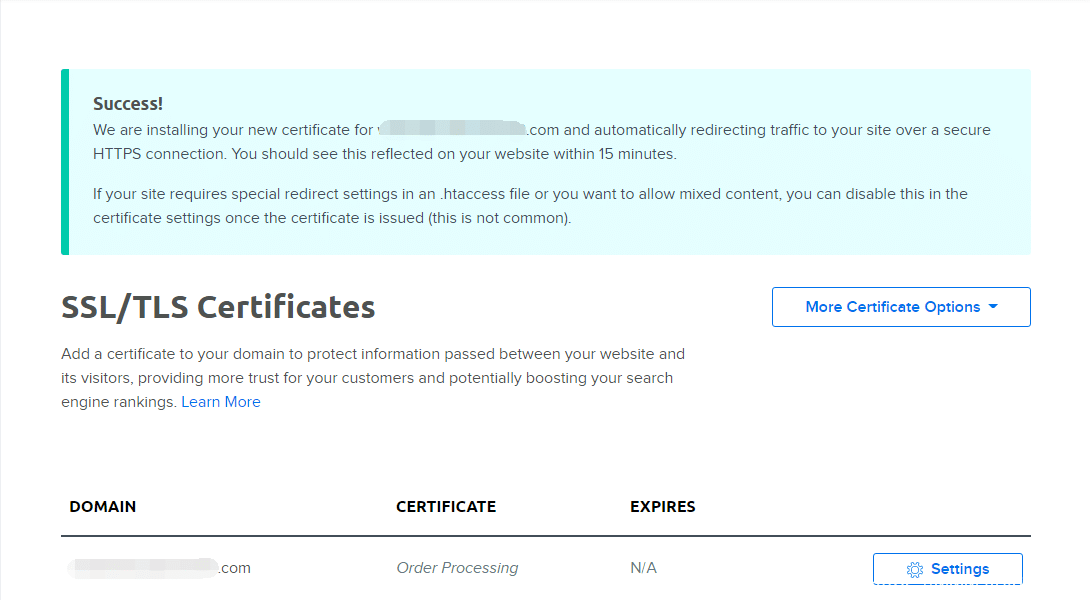
Step 3: Finally, you will see a confirmation page indicating that the SSL certificate has been successfully installed. It will also inform you that your website will automatically redirect from HTTP to HTTPS.

That’s the process of adding an SSL certificate to your website using DreamHost hosting. Clicking on “Settings” after selecting your domain certificate will allow you to manage the installed SSL certificate, view its specific details, and perform actions such as deletion.
It’s worth noting that while free SSL certificates have a two-month validity period, they will be automatically renewed, so you don’t need to worry about expiration issues.

